- Learn how to build data-driven, dynamic Shopify themes with Liquid syntax.
- Ensure clean, scoped codes with render over include.
- Leverage dev tools and JSON output for smarter debugging.
- Get unmatched user experience and speed with asset optimization.
- Adhere to Shopify CLI and Theme Check.
Shopify has become the go-to destination for eCommerce development, with its best-in-class features, functionalities, marketplace, and more. While a lot of things come out of the box, you still need to make a few tweaks (especially in the themes) to go the extra mile.
Whether you’re just getting started with Shopify theme building and customization or you’re a Liquid wizard in disguise, having a quick-access cheatsheet can save your time, brain cells, and maybe even your caffeine budget.
That’s why we have handcrafted the 2025 version of the Shopify Theme Developer Cheatsheet, where you can find all essentials, from development best practices and Liquid syntax to must-know objects.
So, without further ado, let’s jump in! One {{ handle }} at a time.
1. What is Shopify Theme Development?

Before we start slinging Liquid tags, let’s define the basics. Shopify theme development refers to the process of developing and customizing the theme (the frontend presentation layer) of a store. It typically includes the following:
- HTML, CSS, and JavaScript development
- Development using Shopify’s open-source templating language – Liquid
- Integration with Shopify’s data objects such as product, collection, cart, etc.
- Cross-device and cross-browser compatibility
- Following Shopify’s Online Store 2.0 guideline
Themes power the customer experience. A well-crafted theme improves conversion, enhances branding, and reduces bounce rate.
2. Must-Know Liquid Syntax for Theme Developers
Liquid is the secret sauce of Shopify themes. It’s logic-meets-template, designed for building dynamic storefronts without diving into heavy backend logic.
Here’s your essential syntax list:
| Syntax | Description |
| {{ variable }} | Outputs a value |
| {% if condition %} | Conditional logic |
| {% for item in array %} | Loops through an array |
| {% assign x = y %} | Sets a value |
| {% render ‘snippet’ %} | Inserts a snippet |
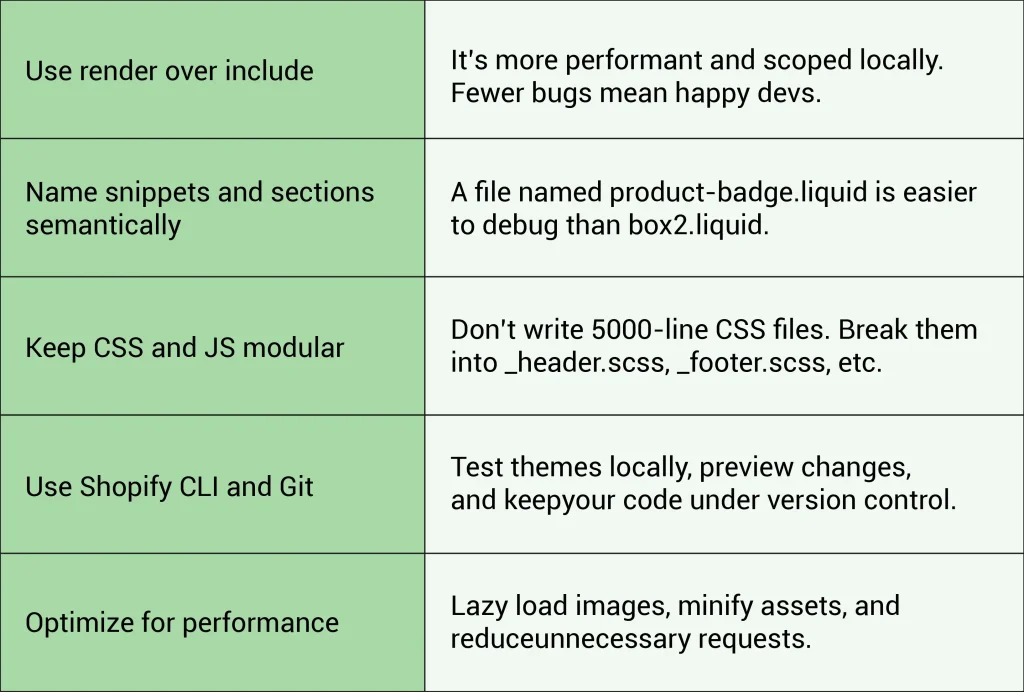
Pro Tip: Avoid using include (legacy). Use render for modular, maintainable code.
3. Key Liquid Objects Every Developer Should Know
Liquid comes with predefined objects that give you access to your store’s data. Here are the core ones you’ll use regularly:
Product Object (product)
These are some of the most commonly used product properties (from the PDF and Shopify Docs):
| Property | What It Does |
| {{ product.title }} | Displays the product’s name |
| {{ product.handle }} | Used to generate product URLs |
| {{ product.description }} | Full product description |
| `{{ product.description | truncate: 100 }}` |
| {{ product.type }} | Displays product category |
| {{ product.vendor }} | Brand or manufacturer name |
| {{ product.tags }} | Array of tags for filtering/searching |
These objects let you loop through collections, filter products, show dynamic content, and personalize product pages.
4. Folder & File Structure of Shopify Themes
Every theme follows a standardized file and folder structure. Let’s break it down:
| Folder | Purpose |
| /assets | CSS, JS, fonts, images |
| /config | Settings data (e.g., settings_schema.json) |
| /layout | Main templates like theme.liquid |
| /locales | Translations for multi-language support |
| /sections | Reusable content blocks (e.g., hero, banner) |
| /snippets | Small reusable code blocks (e.g., buttons, badges) |
| /templates | Core templates for pages (e.g., product.liquid, cart.liquid) |
Understanding where everything goes helps you build organized and scalable themes.
5. The Online Store 2.0 (OS2.0) Paradigm Shift
Since its rollout, Online Store 2.0 has been a game-changer. This is what you get with it:
- Sections Everywhere: Not just the homepage, you can now use sections on any page.
- Dynamic Sources: Theme content can bind to dynamic store data, such as products or collections.
- App Blocks: Apps can now inject their widgets directly into the theme, via blocks.
What You need to know:
- OS 2.0 now has templates like main-product.liquid and main-collection.liquid
- Every template should reference a JSON file (e.g., product.json) to enable block-based editing in the Theme Editor.
6. Best Practices for Shopify Theme Development

7. Theme Settings & Customization (settings_schema.json)
This file powers the Theme Editor’s UI, allowing merchants to toggle visibility, colors, images, and more.
Key Schema Blocks:

{

  "name": "Hero Image",

  "settings": [

    {

      "type": "image_picker",

      "id": "hero_image",

      "label": "Upload Hero Image"

    },

    {

      "type": "text",

      "id": "hero_text",

      "label": "Hero Text"

    }

  ]

}
Thanks to this, merchants don’t have to touch the code to customize themes. This is a huge benefit for store owners with little to no technical knowledge.
8. Advanced Liquid Filters & Operators
After you get a grip on the basics, you will be able to manipulate data with Liquid filters. These little tools help you modify strings, numbers, arrays, and objects right inside your templates.
Most-Used Filters for Theme Development
| Filter | Purpose |
| ` | upcase` |
| ` | downcase` |
| ` | capitalize` |
| ` | truncate: 50` |
| ` | slice: 0, 10` |
| ` | join: “, “` |
| ` | split: “, “` |
| ` | replace: “old”, “new”` |
Example:
{{ product.title | upcase }}

{{ product.description | truncate: 120 }}
Logical Operators in Liquid:
You’ll often need to evaluate logic. Here’s what you get:
- == → Equal to
- != → Not equal
- > / < → Greater than / Less than
- or, and, contains → Combine or check values
{% if product.tags contains 'featured' and product.available %}

  <span>Featured & In Stock</span>

{% endif %}
9. Useful Tools and Resources for Shopify Theme Devs
Shopify theme development isn’t just about code; it’s about using the right tools to build better and faster. Here are some essentials:
Shopify CLI (Command Line Interface)
Your must-have toolkit for:
- Creating new themes
- Watching local changes
- Deploying to stores
- Previewing themes without publishing
shopify theme dev
Theme Check
An official static analysis tool to catch Liquid errors, performance issues, and bad practices in your codebase.
- Run it via CLI or integrate with VS Code
- Helps keep themes compliant with Shopify’s standards
Online Store 2.0 Documentation
Always check Shopify’s dev docs for updates. OS2.0 is evolving fast and staying updated is critical.
GitHub + Git Workflow
Never build without version control. Branch often. Commit regularly. Avoid crying later.
10. Debugging Liquid
Something broken? No worries. Debugging Liquid is half instinct, half discipline.
Use {{ debug | json }}
Print complex variables in JSON format to understand their structure.
{{ product | json }}Check for typos in tags
Remember, Liquid is whitespace-tolerant but case-sensitive.
{% if Product.title %} → ❌

{% if product.title %} → ✅
Comment out blocks to isolate issues
{% comment %}

  Debugging this block

{% endcomment %}
Use Shopify’s Preview + Console Logs
Open Theme Editor → Preview store → Inspect element → Watch errors, console logs, network activity.
11. Real-Life Scenarios You’ll Encounter (and How to Handle Them)
Let’s face it — developing Shopify themes means solving real, weird, edge-case puzzles.
Client wants different product badges for different tags
{% if product.tags contains 'bestseller' %}

  <div class="badge badge--bestseller">Bestseller</div>

{% elsif product.tags contains 'new' %}

  <div class="badge badge--new">New Arrival</div>

{% endif %}
Custom collection banner on only certain collections
{% if collection.handle == 'summer-sale' %}

  {% render 'collection-summer-banner' %}

{% endif %}
Homepage with dynamic blocks and call-to-action
Use section files and blocks inside schema to let merchants configure content without hardcoding.
{% schema %}

{

  "name": "Hero",

  "blocks": [

    {

      "type": "text",

      "name": "Headline"

    },

    {

      "type": "image_picker",

      "name": "Hero Image"

    }

  ]

}

{% endschema %}
12. Theme Performance Optimization Checklist
Slow themes are conversion killers. Here’s a quick performance tune-up plan:
- Use lazy loading: <img loading=”lazy”>
- Minify CSS & JS: Use build tools like Webpack or Gulp
- Avoid excessive nested loops: Expensive in Liquid
- Limit external scripts: Google Fonts? Analytics? Don’t overdo it
- Compress images: Use WebP or compressed JPEGs
Shopify also recommends using the Lighthouse Report in Chrome DevTools to measure performance impact.
13. Print-Ready Cheatsheet for Quick Access
If you’re like most developers, you probably want something you can stick on your wall. Here’s a quick-print summary:
Syntax Shortlist
{{ variable }} → Output value

{% if condition %} → Logic

{% for item in array %} → Loop

{% assign x = y %} → Assign value

{% render 'snippet' %} → Include file
Product Object Snippets
{{ product.title }}

{{ product.handle }}

{{ product.description | truncate: 120 }}

{{ product.tags }}
CLI Commands
shopify theme init

shopify theme dev

shopify theme push
Final Thoughts
Being a Shopify theme developer in 2025 isn’t just about knowing Liquid — it’s about thinking modularly, developing for scalability, and building user-friendly experiences. Whether you’re debugging a Liquid loop or architecting a full Online Store 2.0 layout, the key is to stay curious, stay updated, and keep your workspace DRY (Don’t Repeat Yourself).


